Perfect accuracy can make or break a building. If you’ve ever looked at a crooked wall or a lopsided doorway, you know what I mean. But what if I told you there’s a simple trick—used for thousands of years—that can help you create a flawless right angle, even if you don’t own a laser level? Welcome to the world of the 3 4 5 method, the old-school hack that even new-school builders still swear by. This isn’t just math; it’s the secret handshake of builders everywhere.
How the 3 4 5 Method Works and Why It Matters
The 3 4 5 method is ancient—its roots run back to the earliest Egyptian builders and got a major shout-out in Pythagoras’ Theorem. Here’s how it works: If you make a triangle with sides measuring 3 units, 4 units, and 5 units, the corner between the 3 and the 4 is exactly 90 degrees—a perfect right angle. And it doesn’t matter if you’re using feet, meters, or even breadsticks—keep the proportions and you’ll have a right angle every time. This magic triangle isn’t just a party trick. It’s how pros lay out foundations, position walls, and set forms for concrete—anywhere precision matters.
This method’s real beauty is its simplicity. You don’t need expensive tools or even advanced math skills. You just need something to measure with, some string or chalk, and three numbers: three, four, five. Some folks make their own permanent 3-4-5 triangles from wood to save time on every new job site.
In practical terms, building codes don’t care how you get your corners square—as long as they’re right. If you cheat these corners, it’ll haunt you later. Crooked foundations translate into misaligned floors, janky windows, and a never-ending headache of fixes down the road.
Using the 3 4 5 Method: Step-By-Step Guide
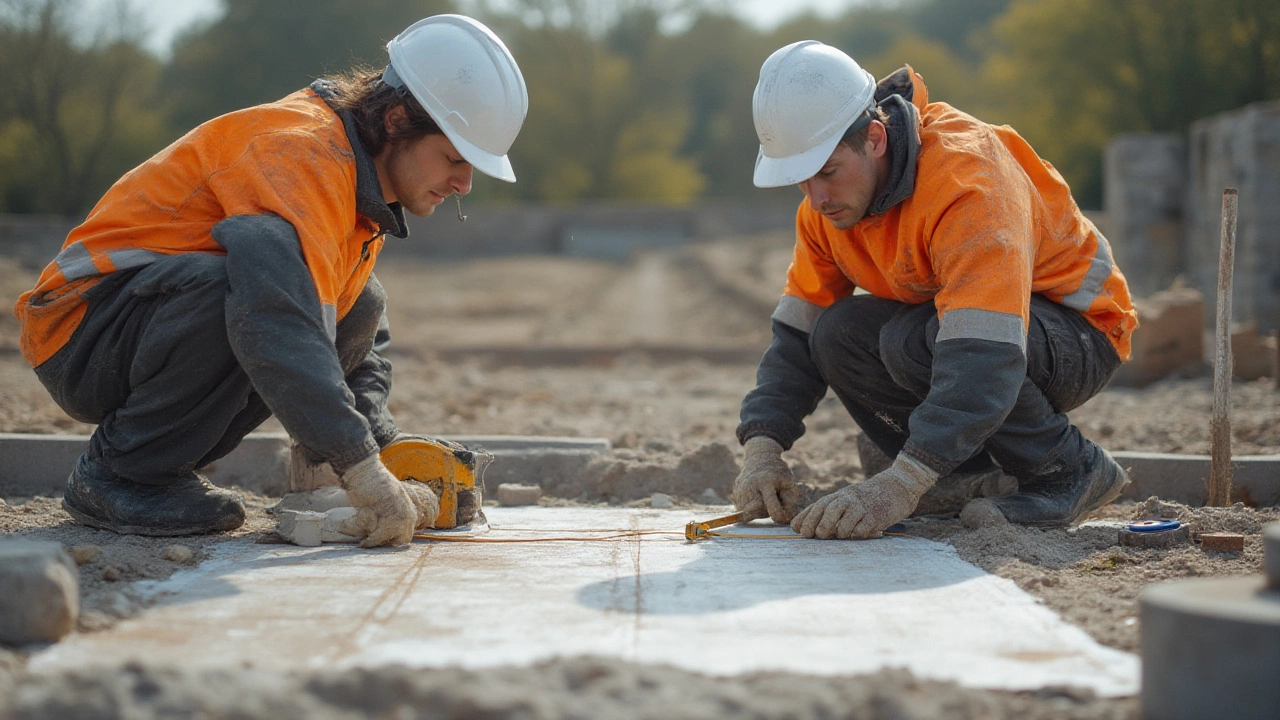
Alright, let’s get our hands dirty. Here’s how you use the 3 4 5 method to square a corner, whether you’re marking out a house foundation or just building a backyard shed. All you need is a tape measure and maybe some stakes and string.
- Start by laying out one wall. Let’s call this your "baseline." Drive a stake at each end.
- From one stake, measure out exactly 4 feet (or meters) along your baseline and mark it. This will be Point A. You’re about to create two sides of a triangle from here.
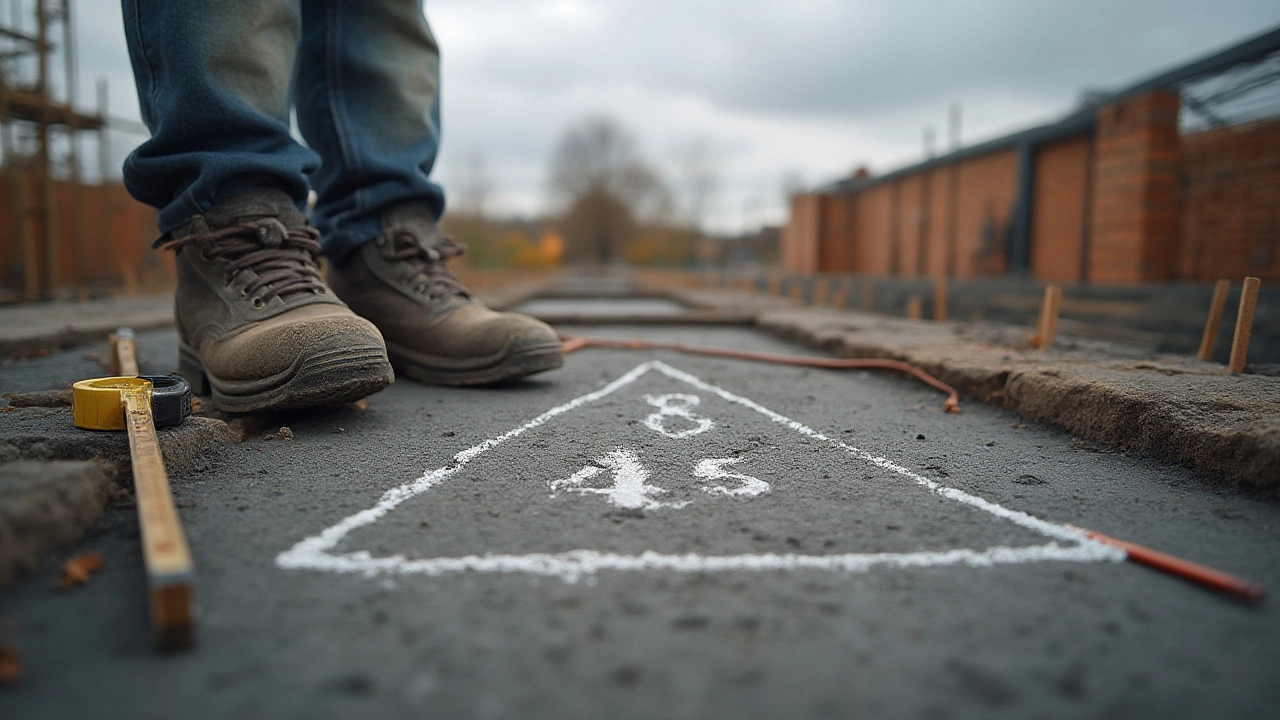
- Now, from that same starting stake, measure 3 feet at a 90-degree angle from the baseline. You can use a rough guess or even a carpenter’s square to get the general direction. Mark this as Point B.
- Here’s where the magic happens: Measure the diagonal distance from Point A (the 4-foot mark on the baseline) to Point B (the 3-foot mark off the baseline). Adjust Point B until this diagonal distance is exactly 5 feet. When these three points form sides of 3, 4, and 5 feet, you’re looking at a perfect right angle at the starting stake.
- Run your next wall through Points B and the starting stake. This wall will be square to your baseline.
If you’re working on a bigger project, just keep multiplying: maybe you want to do 6, 8, 10, or even 9, 12, 15. As long as you keep the ratio, the triangle stays true.
This method isn’t just for pros. I’ve seen weekend warriors use it to build decks, poultry sheds, or even frame new rooms. Some surveyors even use it outdoors, stretching huge tapes across fields to map out square corners on big construction lots.
Classic Mistakes and How to Avoid Them
Even a tried-and-true method like this can go sideways if you’re not careful. The most common blunder? Being sloppy with your measurements. If you’re off by even half an inch or let your tape sag, you’ll lose that crisp right angle—so measure tight, keep the tape straight, and double-check your marks before hammering anything in.
Busted tape measures are another headache. An old builder friend once fixed a tape with duct tape halfway through a hot summer—only to find all his walls drifting out of square by the last day. Lesson learned: always use a good tape, and make sure it hasn’t stretched or broken.
If your site’s got a slope or isn’t perfectly flat, the string or tape can bow down—not ideal for accuracy. Pro tip: Try pulling your tape tight, or use stakes to hold your string off the ground. If things start looking weird, measure the triangle twice from both corners—not just one side—to catch any sneaky errors.
Finally, beware of “helpful” shortcuts. Sometimes folks try to eyeball the angle or skip the final check on the 5-foot side. Don’t do it. The whole method hinges on that diagonal matching up perfectly. It doesn’t matter if it feels close—measure that last angle dead-on. That’s the cornerstone your whole project sits on.
Why Builders Still Use the 3 4 5 Method
With lasers everywhere and some wild new apps promising instant accuracy, you might wonder: Why keep using an old trick from ancient Greece? Fact is, the 3 4 5 method is still the gold standard because it never fails—even if your batteries are dead or your phone’s at home. It works in rain, dust, and darkness, and you can teach it to anyone in five minutes flat.
A lot of construction jobs—especially residential builds and smaller commercial work—still use this method as a first step. Lay out your lines with a 3 4 5, and then use lasers or levels to check. If the numbers agree, you’re good to go. If not, you trust the triangle, adjust, and save yourself a mess of work down the line.
Here’s a quick look at how fast this method still is compared to the high-tech stuff. In a 2023 study, three-person crews were able to lay out foundation corners using 3 4 5 triangles in less than 15 minutes with an average deviation of less than 1/8 inch. Laser levels were more accurate—down to 1/16 inch—but took over 30 minutes to set up, and that’s not counting time lost to glare or sunlight interference.
| Method | Setup Time | Accuracy (avg error) |
|---|---|---|
| 3 4 5 Triangle | 15 minutes | 1/8 inch |
| Laser Level | 30+ minutes | 1/16 inch |
| GPS Survey Equipment | 60+ minutes | 1/32 inch |
GPS and lasers are awesome if you have a giant crew and a million-dollar budget. For everything else? The 3 4 5 keeps it simple, quick, and rock-solid dependable. Plus, it builds trust—every crew member can see the numbers and check themselves.
Pro Tips: Making the 3 4 5 Method Even Easier and More Accurate
If you’re looking to up your game, here are some builder-tested tips that’ll help you get the most out of this timeless method:
- Go big for better accuracy: If your layout allows, multiply everything by 3 or even 5. Try using 9 feet, 12 feet, and 15 feet—or even 30, 40, 50! The bigger your measurements, the less likely tiny tape errors will throw things off. It’s just a fact: little errors make less difference when your triangle is big.
- Paint your marks: When working under the hot sun, use bright paint to spot marks later. No more guessing where that stake was in the grass.
- Double-check every angle: Always measure the diagonal. If you’re in a hurry, it’s tempting to skip, but this step guarantees you’re square.
- Permanent layouts: For repeat jobs, some pros cut a triangle jig from plywood or scrap metal. Just lay it down, trace the corners, and you’re done in no time flat.
- DIY angles when you’re solo: If you’re working alone, anchor one end of the tape or string, and pull tight—stakes and clips are lifesavers here.
- Use metric or imperial—but don’t mix: Keep your units consistent, or you’ll get a skewed triangle. Make all sides the same—3 meters, 4 meters, 5 meters works as perfectly as feet or inches.
- Foam or chalk: Quick fixes for marking points indoors—use chalk lines for slabs, foam for tile layouts, and tape for marking up finished wood floors.
Builders love to share their hacks. Some old-school pros carry a 3 4 5 triangle keychain as a quick reference for apprentices starting out. Others tattoo the numbers on the inside of their wrist—never hurts to have a backup!
No matter how modern the tools get, this simple triangle won’t be going anywhere soon. There’s something satisfying about watching a crisp, straight wall take shape the old way—and knowing you can count on it every single time.